Himi 原创, 欢迎转载,转载请在明显处注明! 谢谢。
//——2012-12-11日更新 获取"产品付费数量等于0这个问题"的原因
看到很多童鞋问到,为什么每次都返回数量等于0??
这里也是由于Himi疏忽的原因没有说明,这里先给童鞋们带来的麻烦,致以歉意。
//——2012-6-25日更新iap恢复
看到很多童鞋说让Himi讲解如何恢复iap产品,其实博文已经给出了。这里再详细说下:
首先向AppStore请求恢复交易:
1
|
[[SKPaymentQueue defaultQueue] restoreCompletedTransactions];
|
然后当用户输入正确的appStore账号密码后,进入
- (void)paymentQueue:(SKPaymentQueue *)queue updatedTransactions:(NSArray *)transactions//交易结果
进入上面函数中的
1
2
3
4
5
6
|
case SKPaymentTransactionStateRestored:
{
[self restoreTransaction:transaction];
}
break;
|
然后我们再以下重写函数中处理即可!
- (void) restoreTransaction: (SKPaymentTransaction *)transaction
//——-
终于在11月公司的游戏即将上线了,那么对于iOS游戏来说当今都是内置道具收费属于主流,那么我们的游戏也是内置收费,所以Himi这里分享给大家关于内置应用收费以及申请测试账号进行测试购买的经验;
在应用内嵌入付费代码这一快Himi可以直接将代码分享给大家,所以我们来说一些主要流程,毕竟没有接触过这一块的童鞋肯定相当头疼 =。 =
OK,步入整体,如果你想在iOS里内嵌收费,那么分为以下几步:
【提示:以下创建App部分内容,你不用非要等项目能打包了才开始做,可以随时并且随便的创建个测试项目即可,因为嵌入付费并不要求上传App的ipa包的!!】
第一步:你需要在iTunesConnect中创建个新的App,然后为这个App设置一些产品(付费道具)等;
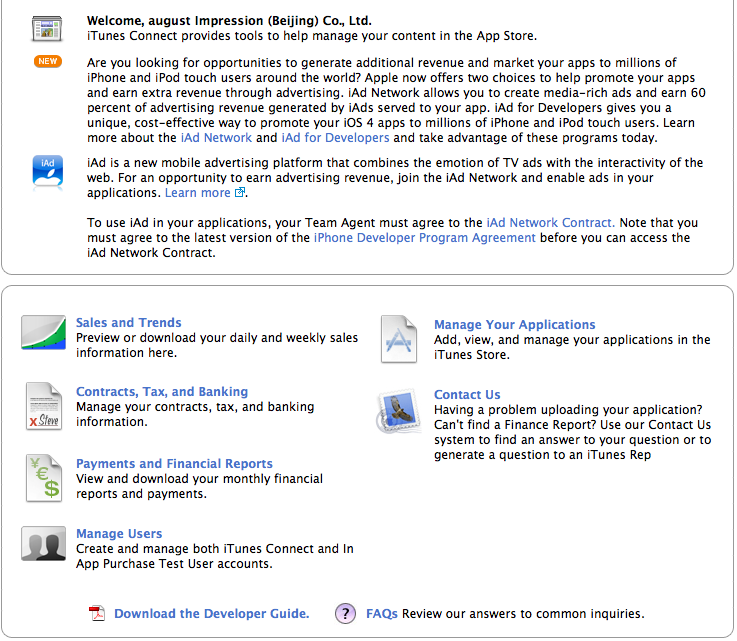
OK,这里Himi稍微解释下,iTunesConnect是苹果提供的一个平台,主要提供AP发布和管理App的,最重要的功能是创建管理项目信息,项目付费产品(道具)管理、付费的测试账号、提交App等等,这里就简单介绍这么多,关于产品一词在此我们可以理解成游戏道具即可;在苹果看来所有付费都属于产品 =。 =千万不要纠结字眼哦~
成功登陆后的页面如下:
这里大概说下重要的一些项:
Contracts, Tax, and Banking : 管理银行账号、联系人以及税等等;这里要根据提示完成对应的信息填写!一定要详细填写喔~
Manage Users :管理用户的,比如主账号以及测试付费的(测试App)账号;
Manage Your Applictions:管理应用程序的,你所有发布的应用和每个应用的状态都在这里面;
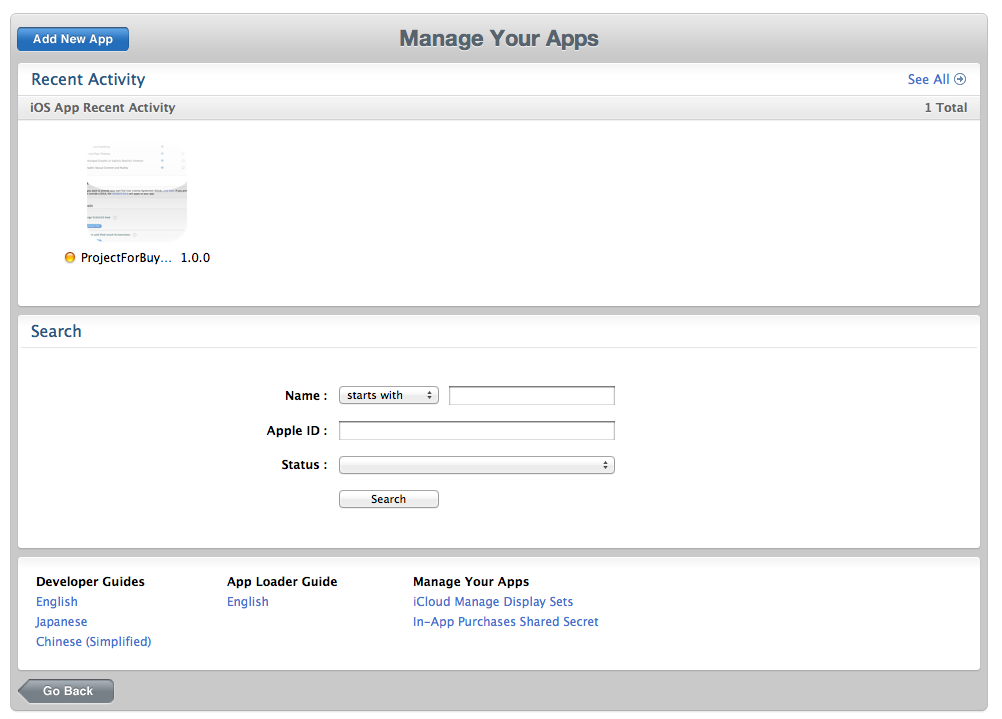
下面我们新建一个App项目,大家放心,我们这里创建的是不会直接提交给App审核的,所以放心创建,只要控制好App的状态不要是待审核状态即可,不过即使你不小心将项目提交了,也没事,直接更改App状态即可了;
选择Manage Your Applictions选项,然后新建一个项目:【Add New App】,根据提示来填写吧,这里就不细致说明了~
创建好一个App之后,在点击Manage Your Applictions后的界面应该如下:
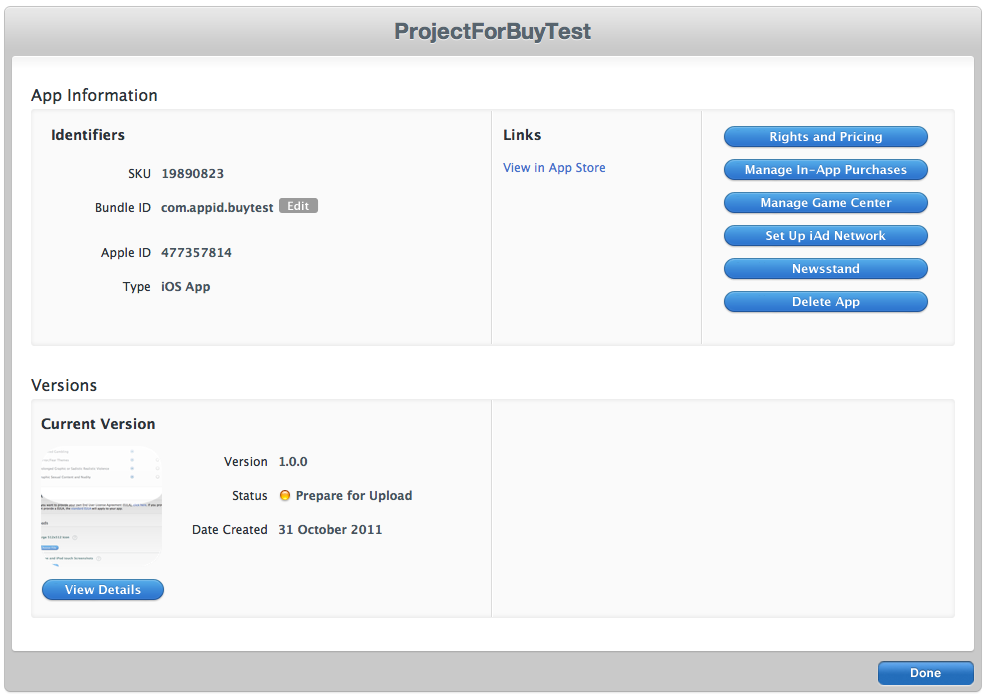
这里你将看到自己创建的App,点击你创建的App项目,这里Himi创建的项目名字叫”ProjectForBuyTest“,点击你的App进入如下界面:
(注意:这里的Bundle ID一定要跟你的项目中的info.plist中的Bundle ID保证一致!!!!)
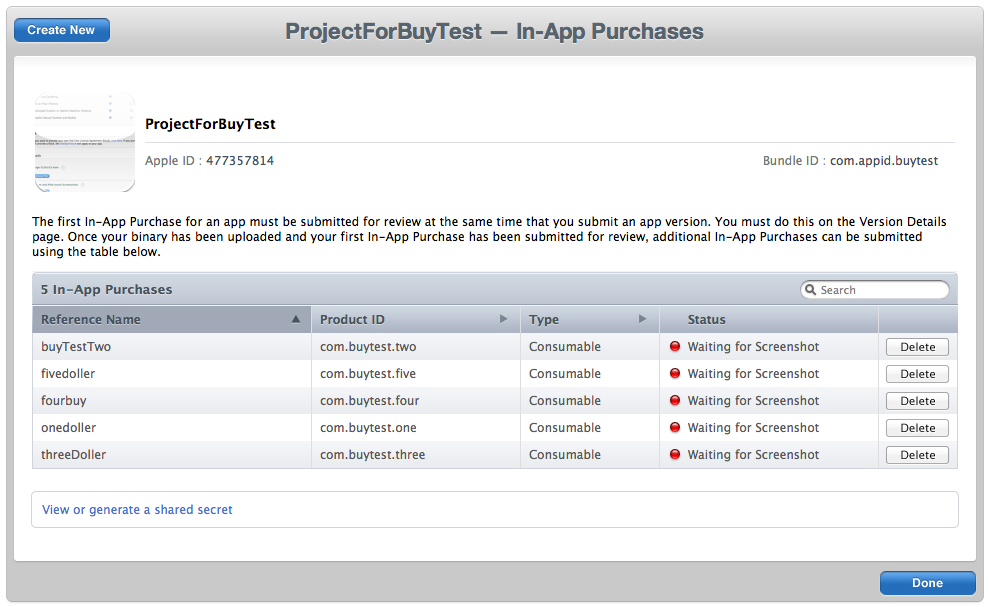
这里可以管理你的项目的信息、状态、是否嵌入GameCenter等等选项,那么本章我们重点介绍如何使用IAp沙盒测试程序内付费,所以这里我们点击右上角的”Manage In-App Purchases“选项进入创建产品(游戏道具)界面如下:
上图中的下方看到Himi创建过的四个产品(道具)了,你可以点击”Create New“选项新建一个产品(付费道具),点击新建如下界面:
上图中Himi没有截图出所有的选项,这里大概介绍下,这个界面是选择你的消费道具的种类,种类说明如下:
类型选择有四种选择:
1.Consumable(消耗品): 每次下载都需要付费;
2.Non-consumable(非消耗品): 仅需付费一次;
3.Auto-Renewable Subscriptions:自动订阅;
4.Free Subscription:免费订阅
最下方是你沙盒测试的截图,暂且不管即可;
这里Himi选择Consumable选项,比如很多游戏都是购买金币啦这样子就可以选择这个;然后出现如下界面:
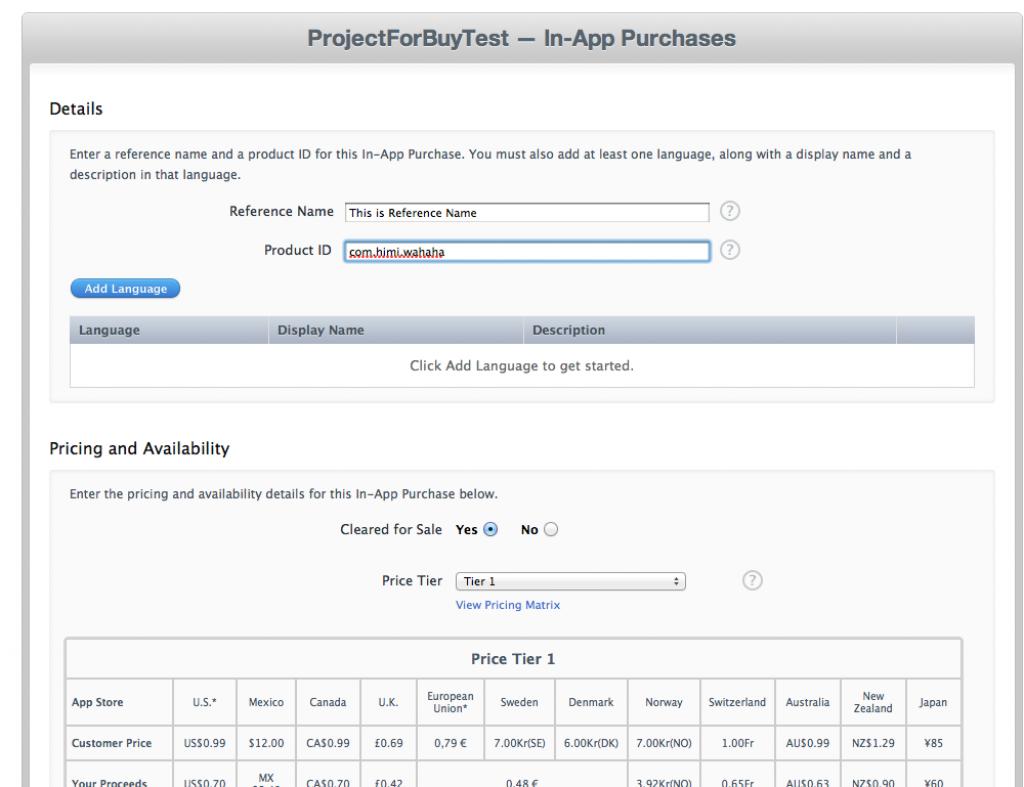
Reference Name: 付费产品(道具的)参考名称
Product ID(产品ID): 你产品的唯一id。通常格式是 com.xx.yy,但它可以是任何形式,不要求以程序的App ID作为前缀。
Add Language: 添加产品名称与描述语言;
Price Tier:选择价格,这里你选择价格后,会出现如上图最下方的价格对照表
Screenshot(截屏): 展示你产品的截屏。(这个直接无视,测试App务必要管这个的)
Product ID(产品ID)可以创建多个,比如我想游戏中分为0.99$ 、1.99$等道具那就创建对应多个产品ID!
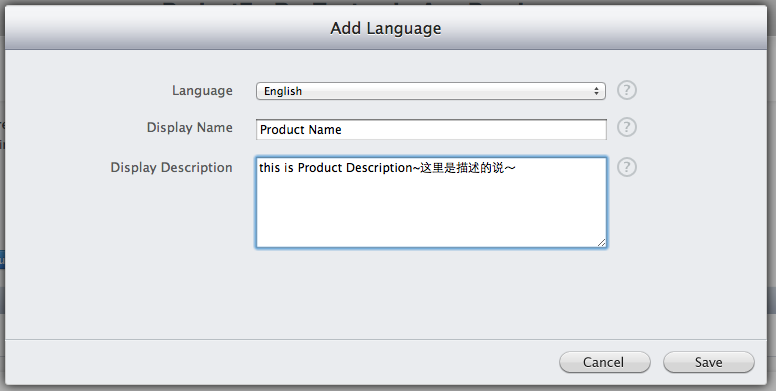
我们填写好了”Reference Name“与”Product ID“以及”Price Tier“后,点击”Add Language“选项然后出现如下界面:
上图中的选项:
Language:语言
Displayed Name(显示名称): 用户看到的产品名称。
Description(描述): 对产品进行描述。
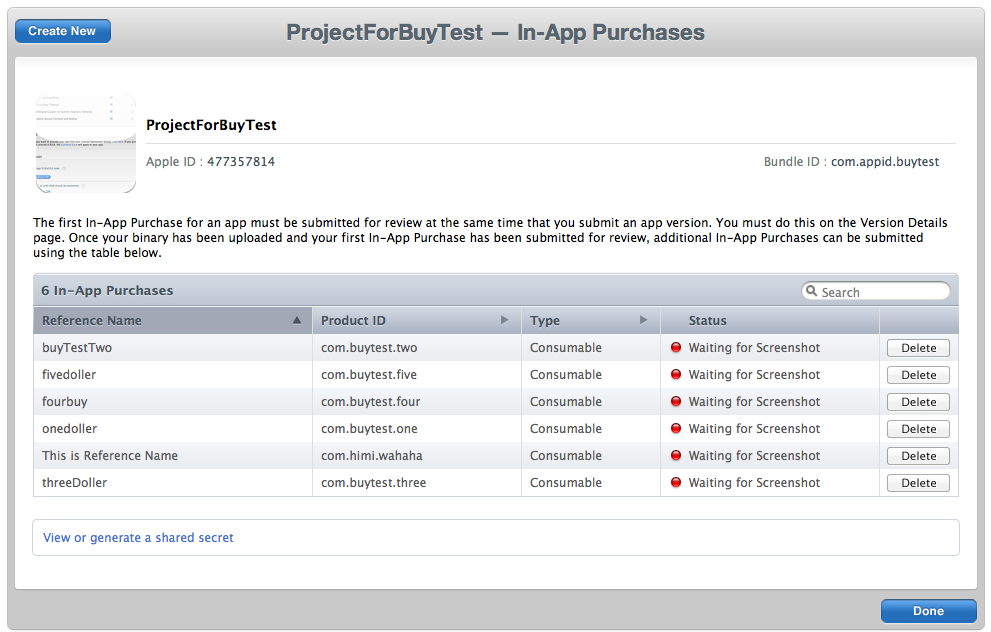
Ok,一路 Save保存回到”Manage In-App Purchases“界面中会看到我们新建的产品(道具)如下:
大家可以看到新建的产品(道具)ID:这里Himi创建的产品ID是com.himi.wahaha ,这里要记住这个产品ID哦~
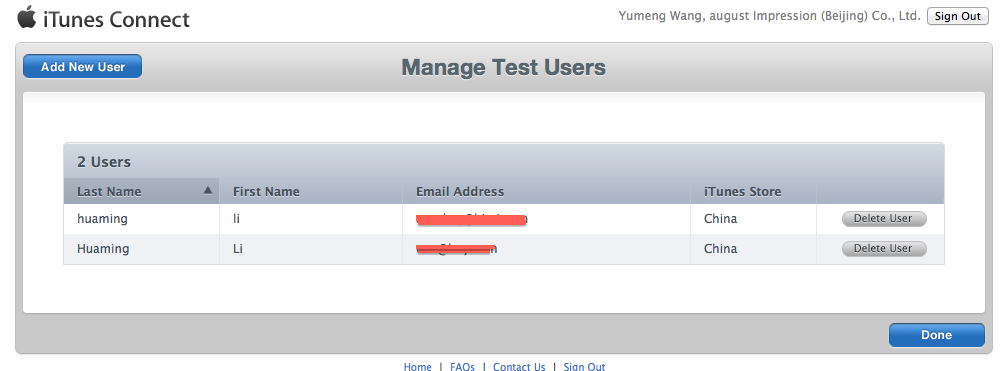
第二步:申请测试账号,利用沙盒测试模拟AppStore购买道具流程!
回到itunesconnect主页中,选择“Manage Users”然后选择“Test User”,然后出现的界面如下图:
这里Himi已经创建了两个测试账号了,点击界面中的 “Add New User”进行创建即可;记住账号和密码哈,记不住就删掉重新建 娃哈哈~(切记:不能用于真正的AppStore中使用此账号,不仅不能用,而且一旦AppStore发现后果你懂得~)
第三步:在项目中申请购买产品代码以及监听;
这里关于购买的代码部分呢,我都有备注的,Himi这里就不详细讲解了,Himi只是在代码后介绍几点值得注意的地方:
这里Himi是新建的一个Cocos2d的项目,然后给出HelloWorldLayer.h以及HelloWorldLayer.m的全部代码,所有购买代码也全在里面也对应有Himi的注释!
HelloWorldLayer.h
-
-
-
-
-
-
-
-
-
-
- #import "cocos2d.h"
- #import <UIKit/UIKit.h>
-
- #import <StoreKit/StoreKit.h>
- enum{
- IAP0p99=10,
- IAP1p99,
- IAP4p99,
- IAP9p99,
- IAP24p99,
- }buyCoinsTag;
-
- @interface HelloWorldLayer : CCLayer<SKProductsRequestDelegate,SKPaymentTransactionObserver>
- {
- int buyType;
- }
-
- +(CCScene *) scene;
- - (void) requestProUpgradeProductData;
- -(void)RequestProductData;
- -(bool)CanMakePay;
- -(void)buy:(int)type;
- - (void)paymentQueue:(SKPaymentQueue *)queue updatedTransactions:(NSArray *)transactions;
- -(void) PurchasedTransaction: (SKPaymentTransaction *)transaction;
- - (void) completeTransaction: (SKPaymentTransaction *)transaction;
- - (void) failedTransaction: (SKPaymentTransaction *)transaction;
- -(void) paymentQueueRestoreCompletedTransactionsFinished: (SKPaymentTransaction *)transaction;
- -(void) paymentQueue:(SKPaymentQueue *) paymentQueue restoreCompletedTransactionsFailedWithError:(NSError *)error;
- - (void) restoreTransaction: (SKPaymentTransaction *)transaction;
- -(void)provideContent:(NSString *)product;
- -(void)recordTransaction:(NSString *)product;
- @end
HelloWorldLayer.m
-
-
-
-
-
-
-
- #import "HelloWorldLayer.h"
- #define ProductID_IAP0p99 @"com.buytest.one"//$0.99
- #define ProductID_IAP1p99 @"com.buytest.two" //$1.99
- #define ProductID_IAP4p99 @"com.buytest.three" //$4.99
- #define ProductID_IAP9p99 @"com.buytest.four" //$19.99
- #define ProductID_IAP24p99 @"com.buytest.five" //$24.99
-
- @implementation HelloWorldLayer
- +(CCScene *) scene
- {
- CCScene *scene = [CCScene node];
- HelloWorldLayer *layer = [HelloWorldLayer node];
- [scene addChild: layer];
- return scene;
- }
- -(id)init
- {
- if ((self = [super init])) {
- CGSize size = [[CCDirector sharedDirector] winSize];
- CCSprite *iap_bg = [CCSprite spriteWithFile:@"Icon.png"];
- [iap_bg setPosition:ccp(size.width/2,size.height/2)];
- [self addChild:iap_bg z:0];
-
-
- [[SKPaymentQueue defaultQueue] addTransactionObserver:self];
-
-
-
-
-
-
-
-
-
-
- [self buy:IAP24p99];
- }
- return self;
- }
-
- -(void)buy:(int)type
- {
- buyType = type;
- if ([SKPaymentQueue canMakePayments]) {
-
- [self RequestProductData];
- CCLOG(@"允许程序内付费购买");
- }
- else
- {
- CCLOG(@"不允许程序内付费购买");
- UIAlertView *alerView = [[UIAlertView alloc] initWithTitle:@"Alert"
- message:@"You can‘t purchase in app store(Himi说你没允许应用程序内购买)"
- delegate:nil cancelButtonTitle:NSLocalizedString(@"Close(关闭)",nil) otherButtonTitles:nil];
-
- [alerView show];
- [alerView release];
-
- }
- }
-
- -(bool)CanMakePay
- {
- return [SKPaymentQueue canMakePayments];
- }
-
- -(void)RequestProductData
- {
- CCLOG(@"---------请求对应的产品信息------------");
- NSArray *product = nil;
- switch (buyType) {
- case IAP0p99:
- product=[[NSArray alloc] initWithObjects:ProductID_IAP0p99,nil];
- break;
- case IAP1p99:
- product=[[NSArray alloc] initWithObjects:ProductID_IAP1p99,nil];
- break;
- case IAP4p99:
- product=[[NSArray alloc] initWithObjects:ProductID_IAP4p99,nil];
- break;
- case IAP9p99:
- product=[[NSArray alloc] initWithObjects:ProductID_IAP9p99,nil];
- break;
- case IAP24p99:
- product=[[NSArray alloc] initWithObjects:ProductID_IAP24p99,nil];
- break;
-
- default:
- break;
- }
- NSSet *nsset = [NSSet setWithArray:product];
- SKProductsRequest *request=[[SKProductsRequest alloc] initWithProductIdentifiers: nsset];
- request.delegate=self;
- [request start];
- [product release];
- }
-
-
- - (void)productsRequest:(SKProductsRequest *)request didReceiveResponse:(SKProductsResponse *)response{
-
- NSLog(@"-----------收到产品反馈信息--------------");
- NSArray *myProduct = response.products;
- NSLog(@"产品Product ID:%@",response.invalidProductIdentifiers);
- NSLog(@"产品付费数量: %d", [myProduct count]);
-
- for(SKProduct *product in myProduct){
- NSLog(@"product info");
- NSLog(@"SKProduct 描述信息%@", [product description]);
- NSLog(@"产品标题 %@" , product.localizedTitle);
- NSLog(@"产品描述信息: %@" , product.localizedDescription);
- NSLog(@"价格: %@" , product.price);
- NSLog(@"Product id: %@" , product.productIdentifier);
- }
- SKPayment *payment = nil;
- switch (buyType) {
- case IAP0p99:
- payment = [SKPayment paymentWithProductIdentifier:ProductID_IAP0p99];
- break;
- case IAP1p99:
- payment = [SKPayment paymentWithProductIdentifier:ProductID_IAP1p99];
- break;
- case IAP4p99:
- payment = [SKPayment paymentWithProductIdentifier:ProductID_IAP4p99];
- break;
- case IAP9p99:
- payment = [SKPayment paymentWithProductIdentifier:ProductID_IAP9p99];
- break;
- case IAP24p99:
- payment = [SKPayment paymentWithProductIdentifier:ProductID_IAP24p99];
- break;
- default:
- break;
- }
- CCLOG(@"---------发送购买请求------------");
- [[SKPaymentQueue defaultQueue] addPayment:payment];
- [request autorelease];
-
- }
- - (void)requestProUpgradeProductData
- {
- CCLOG(@"------请求升级数据---------");
- NSSet *productIdentifiers = [NSSet setWithObject:@"com.productid"];
- SKProductsRequest* productsRequest = [[SKProductsRequest alloc] initWithProductIdentifiers:productIdentifiers];
- productsRequest.delegate = self;
- [productsRequest start];
-
- }
-
- - (void)request:(SKRequest *)request didFailWithError:(NSError *)error{
- CCLOG(@"-------弹出错误信息----------");
- UIAlertView *alerView = [[UIAlertView alloc] initWithTitle:NSLocalizedString(@"Alert",NULL) message:[error localizedDescription]
- delegate:nil cancelButtonTitle:NSLocalizedString(@"Close",nil) otherButtonTitles:nil];
- [alerView show];
- [alerView release];
- }
-
- -(void) requestDidFinish:(SKRequest *)request
- {
- NSLog(@"----------反馈信息结束--------------");
-
- }
-
- -(void) PurchasedTransaction: (SKPaymentTransaction *)transaction{
- CCLOG(@"-----PurchasedTransaction----");
- NSArray *transactions =[[NSArray alloc] initWithObjects:transaction, nil];
- [self paymentQueue:[SKPaymentQueue defaultQueue] updatedTransactions:transactions];
- [transactions release];
- }
-
-
-
-
-
- - (void)paymentQueue:(SKPaymentQueue *)queue updatedTransactions:(NSArray *)transactions
- {
- CCLOG(@"-----paymentQueue--------");
- for (SKPaymentTransaction *transaction in transactions)
- {
- switch (transaction.transactionState)
- {
- case SKPaymentTransactionStatePurchased:
- [self completeTransaction:transaction];
- CCLOG(@"-----交易完成 --------");
- CCLOG(@"不允许程序内付费购买");
- UIAlertView *alerView = [[UIAlertView alloc] initWithTitle:@"Alert"
- message:@"Himi说你购买成功啦~娃哈哈"
- delegate:nil cancelButtonTitle:NSLocalizedString(@"Close(关闭)",nil) otherButtonTitles:nil];
-
- [alerView show];
- [alerView release];
- break;
- case SKPaymentTransactionStateFailed:
- [self failedTransaction:transaction];
- CCLOG(@"-----交易失败 --------");
- UIAlertView *alerView2 = [[UIAlertView alloc] initWithTitle:@"Alert"
- message:@"Himi说你购买失败,请重新尝试购买~"
- delegate:nil cancelButtonTitle:NSLocalizedString(@"Close(关闭)",nil) otherButtonTitles:nil];
-
- [alerView2 show];
- [alerView2 release];
- break;
- case SKPaymentTransactionStateRestored:
- [self restoreTransaction:transaction];
- CCLOG(@"-----已经购买过该商品 --------");
- case SKPaymentTransactionStatePurchasing:
- CCLOG(@"-----商品添加进列表 --------");
- break;
- default:
- break;
- }
- }
- }
- - (void) completeTransaction: (SKPaymentTransaction *)transaction
-
- {
- CCLOG(@"-----completeTransaction--------");
-
- NSString *product = transaction.payment.productIdentifier;
- if ([product length] > 0) {
-
- NSArray *tt = [product componentsSeparatedByString:@"."];
- NSString *bookid = [tt lastObject];
- if ([bookid length] > 0) {
- [self recordTransaction:bookid];
- [self provideContent:bookid];
- }
- }
-
-
-
- [[SKPaymentQueue defaultQueue] finishTransaction: transaction];
-
- }
-
-
- -(void)recordTransaction:(NSString *)product{
- CCLOG(@"-----记录交易--------");
- }
-
-
- -(void)provideContent:(NSString *)product{
- CCLOG(@"-----下载--------");
- }
-
- - (void) failedTransaction: (SKPaymentTransaction *)transaction{
- NSLog(@"失败");
- if (transaction.error.code != SKErrorPaymentCancelled)
- {
- }
- [[SKPaymentQueue defaultQueue] finishTransaction: transaction];
-
-
- }
- -(void) paymentQueueRestoreCompletedTransactionsFinished: (SKPaymentTransaction *)transaction{
-
- }
-
- - (void) restoreTransaction: (SKPaymentTransaction *)transaction
-
- {
- NSLog(@" 交易恢复处理");
-
- }
-
- -(void) paymentQueue:(SKPaymentQueue *) paymentQueue restoreCompletedTransactionsFailedWithError:(NSError *)error{
- CCLOG(@"-------paymentQueue----");
- }
-
-
- #pragma mark connection delegate
- - (void)connection:(NSURLConnection *)connection didReceiveData:(NSData *)data
- {
- NSLog(@"%@", [[[NSString alloc] initWithData:data encoding:NSUTF8StringEncoding] autorelease]);
- }
- - (void)connectionDidFinishLoading:(NSURLConnection *)connection{
-
- }
-
- - (void)connection:(NSURLConnection *)connection didReceiveResponse:(NSURLResponse *)response{
- switch([(NSHTTPURLResponse *)response statusCode]) {
- case 200:
- case 206:
- break;
- case 304:
- break;
- case 400:
- break;
- case 404:
- break;
- case 416:
- break;
- case 403:
- break;
- case 401:
- case 500:
- break;
- default:
- break;
- }
- }
-
- - (void)connection:(NSURLConnection *)connection didFailWithError:(NSError *)error {
- NSLog(@"test");
- }
-
- -(void)dealloc
- {
- [[SKPaymentQueue defaultQueue] removeTransactionObserver:self];
- [super dealloc];
- }
- @end
代码注释的相当清楚了,没有什么可解释的,这里说几点值得注意的地方:
2. 越狱机器无法沙盒测试!模拟器的话,Himi用4.3模拟器不可以,因为提示没有开启程序内付费- -(我都没看到模拟器有store的选项,so~);但是使用iOS5的模拟器可以测试沙盒,但是执行的顺序会有些问题,但是还没真机的童鞋可以使用,建议一切以真机实测为准
3. 千万不要忘记在iTunesConnect中创建App Bundle ID一定要跟你的项目中的info.plist中的Bundle ID保证一致!!!!
4. 以上代码中你需要修改的就是我在HelloWorldLayer.m类中的宏定义的Product ID(产品ID),例如Himi刚才新建了一个产品ID是“com.himi.wahaha"
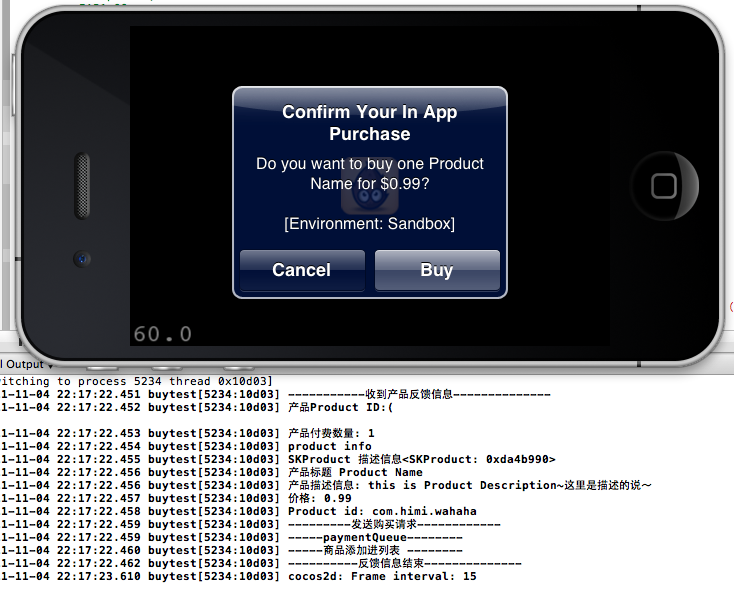
然后我运行项目截图如下以及运行控制台打印的信息如下:
点击Buy之后运行截图以及打印信息:
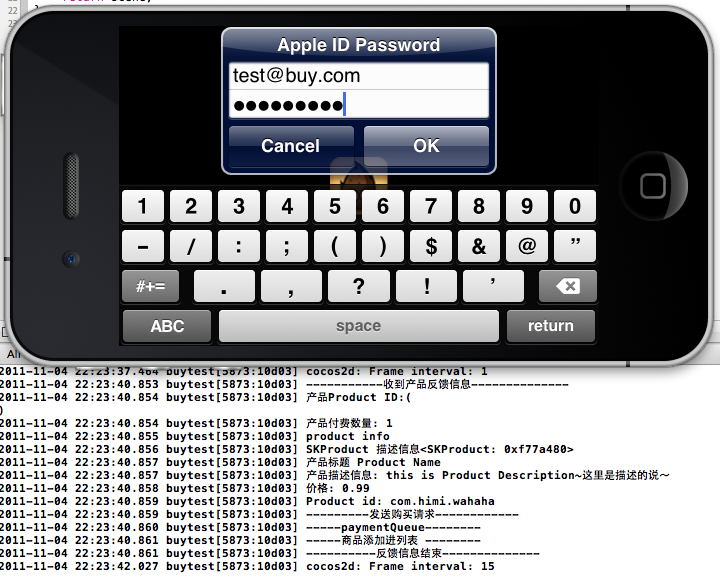
输入测试账号密码后以及打印信息:
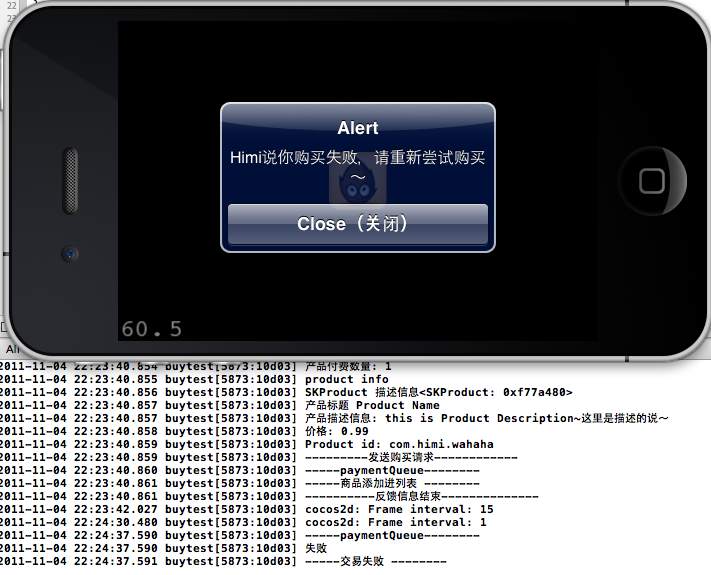
 这里Himi最后一张截图是没有购买成功,这里Himi是故意截图出来的,原因就是想告诉童鞋们:
如果你的产品信息能够正常得到,但是始终无法成功的话,不要着急,因为你的产品要进入iTunes Connect,并且Apple准备好沙箱环境需要一些时间。Himi之前遇到过,然后在过了段时间后我没有修改任何一行代码,但产品ID变为有效并能成功购买。=。 =郁闷ing~~ 其实要使产品发布到Apple的网络系统是需要一段时间的,so~这里别太着急!
越狱机器无法正常测试沙盒的喔~
顺便提示一下:Bundle ID 尽可能与开发者证书的app ID 一致。
好了,写了这么多了,咳咳、Himi继续忙了,做iOS的童鞋们我想此篇将成为你必须收藏的一篇哦~嘿嘿!